
React JS Development Environment Setup using NODE JS
React JS Installation Process: We cannot start working on a JavaScript framework without knowing about the installation of the framework. In this chapter we will learn the following things:
- Installing React in plain HTML.
- Installing React using Node JS.
- Hello World Example in Node JS.
- ReactJS.
NOTE: Remember I will use Node JS CLI in future chapters because CLI is very important rather than React in plain HTML. Every ReactJS project developers use. Node JS to start to React to JS projects. So we will focus on learning Node JS based React”.
Before getting started with a programming language. It is important to set up its environment, with ReactJS we need to set up the ReactJS environment. ReactJS can be installed in two ways:
Installing React in plain HTML
To install react in plain HTML, we need the following libraries to include in our web app and Babel as JavaScript preprocessor to process ES6 standard:
React Itself
https://cdnjs.cloudflare.com/ajax/libs/react/15.3.1/react.min.js
React DOM
https://cdnjs.cloudflare.com/ajax/libs/react/15.3.1/react-dom.min.js
Babel
While including these libraries, Our Initial React Application should look like this:
React with HTML Example
<!DOCTYPE html>
<html>
<head>
<title>React Hello World</title>
</head>
<body>
<div id="root"></div>
<script type="text/javascript" src="react.min.js"></script>
<script type="text/javascript" src="react dom.min.js"></script>
<script type="text/javascript" src="browser.min.js"></script>
<script type="text/babel">
var Hello World React.createClass({
render: function() {
return (
<div>
{this.props.children}
</div>
) ;
}
}) ;
var destination = document.querySelector("#root");
ReactDOM.render(
<div>
<HellWorld>Hello World</HellWorld>
</div>,
destination);
</script>
</body>
</html>
If this code works successfully, our screen will be greeted with printed Hello World.
Installing React using Node JS (CLI)
To install React using CLI, we need Node JS to install, after Node JS install, go to CMD in windows or terminal in Mac/Ubuntu.
To create React App
To create React App within Node JS(CLI) then use the following command.
npm install -g create-react-app
This will install create-react-app globally that will help us to create apps easily and anywhere on our computer. Remember if you are a PHP developer, you don’t need to put REACT JS applications in server like www folder of Xampp and htdocs of Xampp.
To Create Directory
When this installation gets complete, we can install react using:
create-react-app my-app
cd my-app
npm start
This will create a my-app directory and will install a complete react app setup. ReactJS app will be available on http://localhost:3000, on a new app, a message will be print like this

Directory Explanation
After installation of ReactJS CLI application, The ReactJS application folder structure should look like this:
So there are three folders, node_modules, public,node_modules: Node modules contains all important libraries like React, react DOM, react-router, etc.
Public: Public folder contains public assets such as images, icons, files and other important files that can be imported to the app.
src: “src” stands for source, this folder contains JavaScript source files or react app, Which is built on JavaScript, It means this folder contains JavaScript files.
Let’s create a hello world example in the react CLI app. Now delete all files in the src folder, make it empty. Now create two files in the src folder,
- index.js
- Hello World.js
React JS CLI app Example
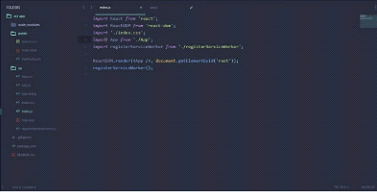
src/index.js
import React from 'react';
import ReactDOM from 'react-dom';
import HelloWorld from !/Hello World.js';
ReactDOM.render(<Hello World/>,
document.getElementByid('root'))
src/HelloWorld.js
import React from 'react';
import ReactDOM from 'react-dom';
export default class HelloWorld extends ReactComponent render() {
return
<div>
<h1>Hello World</h1>
</div>
) ;
}
}
React JS CLI app Example Output
This will print hello world on screen.
Hello World
So far we have learned about
- React
- Principles of React
- Creating an App in React
In this chapter, we have learned how to install ReactJS and created a hello world example. Here is the exercise in the last:
Hello World Example in Node JS
src/HelloWorld.js
import React from 'react';
import React DOM from 'react-dom';
export default class Hello World extends React.
Component{
render() {
return(
<div>
<h1>Hello World</h1>
</div>
);
}
}
src/index.js
import React from 'react';
import React DOM from 'react-dom';
import HelloWorld from './HelloWorld.js';
ReactDOM.render
<HelloWorld/>,
document.getElementByid('root')
)
React JS Summary
We have ended our chapter and we have learned how to create an application. So here are some questions.
- What is create-react-app?
- What is the node_modules folder and why it is used for?
Answers for the questions:
What is create-react-app?
create-react-app is CLI command, this command is provided by ReactJS to install Node JS based ReactJS Application.
We can install this command by using:
npm install create-react-app-g
This will install this CLI command globally so we can install by:
npm install create-react-app
What is a node_modules folder and why it is used for?
node_modules folder contains build tools. node_modules folder contains all libraries which are installed using npm install or yarn install. You will another file package.json, which defines libraries that will install.