
In Java, the code is executed sequentially from top to bottom, following the order in which statements appear. However, to achieve more control over the flow of the program, Java provides control flow statements. These statements allow developers to manipulate the order in which statements are executed, providing a more flexible and efficient program flow. Control flow statements are an essential aspect of Java programming that enhances program functionality and enables developers to create more complex programs.
There are three types of control flow statements that Java offers to control the flow of the program.
1. Decision-Making statements
-
- if statements
- switch statement
2. Loop statements
-
- do while loop
- while loop
- for loop
- for-each loop
3. Jump statements
-
- break statement
- continue statement
Decision-Making Systems in Java
Decision-making statements, as their name implies, determine which statements to execute based on certain conditions. These statements evaluate a Boolean expression and control the flow of the program accordingly. In Java, there are two types of decision-making statements: If statements and Switch statements. If statements execute a block of code only if a specified condition is true, while Switch statements execute different blocks of code depending on the value of a variable. By utilizing these decision-making statements, developers can create more sophisticated and dynamic programs that can adapt to various conditions and inputs.
If Statement:
Java’s “if” statement is designed to evaluate a condition, based on which the program’s control flow can be redirected. The condition specified in the if-statement must return a Boolean value, either true or false. In Java, there are four types of if-statements, given below.
- Simple if statement
- if-else statement
- if-else-if ladder
- Nested if-statement
Let’s take a closer look at each type of if-statement provided in Java, to better understand their purpose and how they can be used in programming:
1) Simple if statement:
The if statement is one of the fundamental control flow statements in Java. It operates by evaluating a Boolean expression, which determines whether or not the program will enter a particular block of code. If the Boolean expression is true, the code within the if-block will be executed. However, if the expression is false, the program will bypass the if-block entirely, and execution will continue to the next line of code. The if-statement provides developers with a simple and effective way to control the flow of their programs based on certain conditions.
Syntax:
if(condition) {
statement 1; //executes when condition is true
}
Consider the following example in which we have used the if statement in the Java code.
Teacher.java
public class Teacher {
public static void main(String[] args) {
int x = 10;
int y = 12;
if(x+y > 20) {
System.out.println("x + y is greater than 20");
}
}
}
Output:
x + y is greater than 20
2) if-else statement:
The “if-else” statement is a variation of the basic “if” statement in Java that includes an additional block of code, called the “else” block. If the condition specified in the “if” block evaluates to true, the code within the “if” block is executed. However, if the condition is false, the program will skip the “if” block and instead execute the code within the “else” block.
Syntax:
if(condition) {
statement 1; //executes when condition is true
}
else{
statement 2; //executes when condition is false
}
Consider the following example
Teacher.java
public class Teacher {
public static void main(String[] args) {
int x = 10;
int y = 12;
if(x+y < 10) {
System.out.println("x + y is less than 10");
}   else {
System.out.println("x + y is greater than 20");
}
}
}
Output:
x + y is greater than 20
3) if-else-if ladder:
The “if-else if” statement, also known as the “if-else ladder,” is a type of if-statement that allows developers to create a chain of conditions to determine which block of code to execute. It consists of an initial “if” statement, followed by one or more “else if” statements. Each “else if” statement checks a new condition, and if the condition is true, the corresponding block of code is executed. If none of the conditions are met, the program will execute the code in the optional “else” block at the end of the ladder.
Syntax:
if(condition 1) {
statement 1; //executes when condition 1 is true
}
else if(condition 2) {
statement 2; //executes when condition 2 is true
}
else {
statement 2; //executes when all the conditions are false
}
Example:
Teacher.java
public class Teacher {
public static void main(String[] args) {
String city = "Delhi";
if(city == "Meerut") {
System.out.println("city is meerut");
}else if (city == "Noida") {
System.out.println("city is noida");
}else if(city == "Agra") {
System.out.println("city is agra");
}else {
System.out.println(city);
}
}
}
Output:
Delhi
4) Nested if-statement:
Nested if-statements are a type of if-statement in Java where an “if” statement can contain another “if” or “if-else” statement inside it. In other words, it is possible to have one or more “if” statements inside another “if” statement, creating a nested or layered structure. The inner “if” statement will only execute if the condition specified in the outer “if” statement is true.
Syntax:
if(condition 1) {
statement 1; //executes when condition 1 is true
if(condition 2) {
statement 2; //executes when condition 2 is true
}
else{
statement 2; //executes when condition 2 is false
}
}
Example:
Teacher.java
public class Teacher {
public static void main(String[] args) {
String address = "Delhi, India";

if(address.endsWith("India")) {
if(address.contains("Meerut")) {
System.out.println("Your city is Meerut");
}else if(address.contains("Noida")) {
System.out.println("Your city is Noida");
}else {
System.out.println(address.split(",")[0]);
}
}else {
System.out.println("You are not living in India");
}
}
}
Output:
Delhi
Switch Statement in Java:
Java’s switch statements are another type of control flow statement that functions similarly to the if-else-if statement. However, unlike the if-else-if statement, which evaluates multiple conditions in order, the switch statement evaluates a single variable and chooses the corresponding block of code to execute based on the value of that variable.
The switch statement consists of multiple blocks of code called cases, each of which represents a possible value for the variable being evaluated. When the switch statement is executed, Java compares the variable’s value against each case, and when it finds a match, it executes the corresponding block of code. If no matches are found, a default case can be included to handle the situation.
Switch statements can be easier to read and understand than if-else-if statements, especially when there are many possible conditions to evaluate.
Here are some key points to note about switch statements in Java:
-
- Switch statements evaluate a single variable and execute the corresponding block of code based on the value of that variable.
- Case variables can be of type int, short, byte, char, or enumeration. In Java 7 and later versions, string type is also supported.
- Duplicate cases are not allowed in a switch statement.
- The default statement is optional and executed when none of the cases match the value of the expression.
- The break statement is used to terminate the switch block when a condition is satisfied. If it is not used, the next case in the block will be executed.
- When using switch statements, it is important to ensure that the case expressions are of the same type as the variable being evaluated, and are constant values.
Syntax:
switch (expression){
    case value1:
     statement1;
     break;
    .
    .
    .
    case valueN:
     statementN;
     break;
    default:
     default statement;
}
Example:
Teacher.java
public class Teacher implements Cloneable {
public static void main(String[] args) {
int num = 2;
switch (num){
case 0:
System.out.println("number is 0");
break;
case 1:
System.out.println("number is 1");
break;
default:
System.out.println(num);
}
}
}
Output:
2
In Java, when using switch statements, it is important to note that the case expressions must match the type of the variable being evaluated. Additionally, case expressions must also be constant values, which means they cannot be variables or expressions that are evaluated at runtime.
The switch statement permits only certain types of variables to be used as the evaluated variable, including int, String, and Enum types. This means that if you are evaluating a variable of a different type, you may need to convert it to one of these types before using it in a switch statement.
Loop Statements in Java:
Loop statements in programming are used to execute a set of instructions repeatedly as long as a certain condition is true. They allow for efficient and concise repetition of code without the need for multiple copies of the same instructions.
The repeated execution of the instructions is dependent upon a specific condition, which is evaluated at the beginning of each iteration of the loop. If the condition is true, the instructions in the loop body are executed again. If the condition is false, the loop is exited and execution continues with the next statement after the loop.
There are several types of loop statements in Java:
- for loop
- while loop
- do-while loop
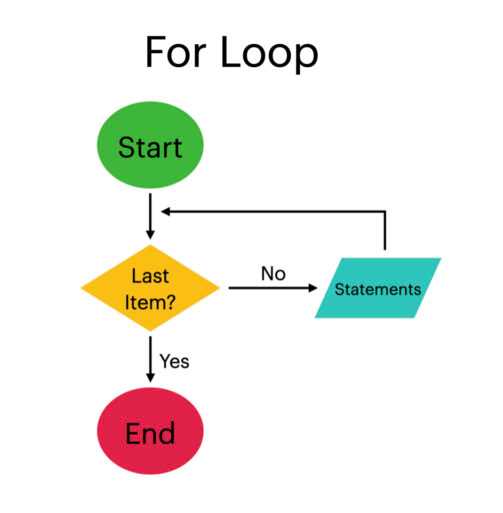
1) for loop:
The for loop in Java is similar to those found in C and C++. It provides a concise way to initialize a loop variable, check a condition, and increment or decrement the variable, all in a single line of code.
The for loop is typically used when the number of times the loop should execute is known in advance. It allows the program to execute a block of code repeatedly for a fixed number of times without having to write out the entire sequence manually.
Syntax:
for(initialization, condition, increment/decrement) {
//block of statements
}
Flow Chart for the for-loop:
Example:
Calculation.java
public class Calculattion {
public static void main(String[] args) {
// TODO Auto-generated method stub
int sum = 0;
for(int j = 1; j<=10; j++) {
sum = sum + j;
}
System.out.println("The sum of first 10 natural numbers is " + sum);
}
}
Output:
The sum of first 10 natural numbers is 55
2) for-each loop:
The enhanced for loop in Java allows for easy traversal of data structures such as arrays and collections. With the for-each loop, there is no need to manually update the loop variable.
for(data_type var : array_name/collection_name){
//statements
}
Example:
Calculation.java
public class Calculation {
public static void main(String[] args) {
// TODO Auto-generated method stub
String[] names = {"Java","C","C++","Python","JavaScript"};
System.out.println("Printing the array names:\n");
for(String name:names) {
System.out.println(name);
}
}
}
Output:
Printing the array names:

Java
C
C++
Python
JavaScript
3) While loop:
In Java, the while loop is another type of loop statement used to execute a block of code multiple times. It is recommended to use a while loop when the number of iterations is not known in advance. Unlike for loop, initialization and increment/decrement are not included inside the loop statement.
The while loop is also called an entry-controlled loop because the condition is checked at the beginning of the loop. If the condition is true, then the loop body will be executed. On the other hand, if the condition is false, then the statements after the loop will be executed.
Syntax:
while(condition){
//looping statements
}
Flow Chart for the While loop:

Example:
Calculation.java
public class Calculation {
public static void main(String[] args) {
// TODO Auto-generated method stub
int i = 0;
System.out.println("Printing the list of first 10 even numbers \n");
while(i<=10) {
System.out.println(i);
i = i + 2;
}
}
}
Output:
Printing the list of first 10 even numbers

0
2
4
6
8
10
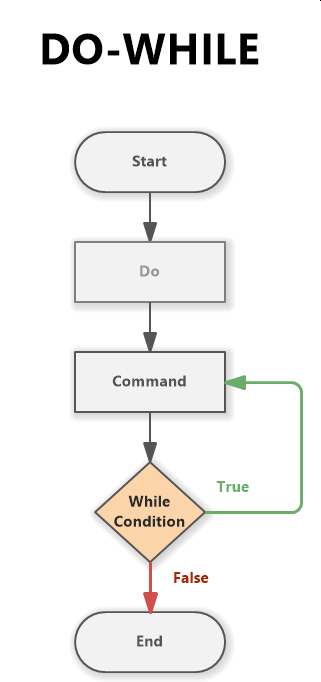
4) do-while loop:
The do-while loop is another type of loop in Java. It is similar to the while loop, but it checks the condition at the end of the loop after executing the loop statements. It is used when the number of iterations is not known in advance and the loop must be executed at least once.
Unlike the while loop, the do-while loop is also known as the exit-controlled loop since the condition is not checked in advance.
Syntax:
do
{
//statements
} while (condition);
Flow Chart for the do-while loop:
Example:
Calculation.java
public class Calculation {
public static void main(String[] args) {
// TODO Auto-generated method stub
int i = 0;
System.out.println("Printing the list of first 10 even numbers \n");
do {
System.out.println(i);
i = i + 2;
}while(i<=10);
}
}
Output:
Printing the list of first 10 even numbers
0
2
4
6
8
10
Jump statements in Java:
Jump statements are an essential part of Java programming, as they allow the control of the program to be transferred to specific statements. In simpler terms, these statements enable the execution control to be moved to another part of the program. Java has two types of jump statements: break and continue.
1) Break Statement:
The break statement disrupts the current flow of the program and transfers the control to the next statement outside a loop or switch statement. However, when dealing with nested loops, it only breaks the inner loop.
It is important to note that the break statement cannot be used outside of a loop or switch statement in Java. It must be written within the block of code defined by a loop or switch statement.
Example:
BreakExample.java
public class BreakExample {
public static void main(String[] args) {
// TODO Auto-generated method stub
for(int i = 0; i<= 10; i++) {
System.out.println(i);
if(i==6) {
break;
}
}
}
}
Output:
0
1
2
3
4
5
6
2) Continue Statement:
The continue statement is used to skip a specific part of the loop and proceed to the next iteration of the loop. It does not break the loop like the break statement.
Example:
public class ContinueExample {

public static void main(String[] args) {
// TODO Auto-generated method stub

for(int i = 0; i<= 2; i++) {

for (int j = i; j<=5; j++) {

if(j == 4) {
continue;
}
System.out.println(j);
}
}
}

}
Output:
0
1
2
3
5
1
2
3
5
2
3
5
We hope you find this article informative for understanding Java Control Statements. To learn more, be sure to follow tutorials.freshersnow.com.