
If you have ever looked at HTML5 before or tried to build a website, you might feel like it is akin to rocket science and that it is complicated and intimidating. Our hope is that as you proceed through this book, the feeling of intimidation will melt away and you will gain meaningful confidence in your ability to build pages for the World Wide Web.
The best place to start building confidence is with a very brief understanding of what HTML5 is and what it is used for. At its simplest, HTML5 is a language used for structuring and presenting content on the World Wide Web. The goal of any website is communication.
Your HTML5 code will structure, format and then work with a browser to present your content to communicate with your visitors. The current standard, HTML5, is the most current standard of the language. HTML is constantly evolving to support the latest in multimedia and technology.
This is good news for you as the language remains current and flexible allowing you to communicate your content on the latest devices and in ways that are important to you.
Most of the additional styling and design elements that infuse web pages come from another language, CSS or Cascading Style Sheet language. We will briefly touch on CSS in this book, but a deeper review of CSS is beyond our scope. We will mainly focus on the basic HTML5 elements of a webpage so that a browser can read your page and deliver it to your visitors.
The first step to learning a simple approach to HTML5 and building pages for the web is to understand how simple the building blocks actually are. The basic building blocks of all HTML5 programs are elements, tags, and attributes.
The foundation of your program will be your HTML elements, and your tags and attributes are parts of your elements that give you control over the content, layout, and structure of your content and ultimately, your site.
Here is an example of tags.
<p>This is a text that will appear on a website</p>
We will cover many types of tags and what they mean later in the book. In this case, <p> is short for the paragraph, and the text between the bracketed tags will appear in the browser. It is not necessary to what about what the tags do yet. It is more important to focus on the overall structure.
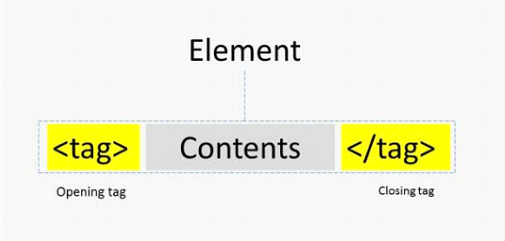
Figure: HTML elements and tags
Tags are always bookended by angle brackets. The letters inside the brackets indicate the type of tag it is. The contents of the tag represent the content that the tag is structuring for a browser.
Most tags have a closing tag which is symbolized by a forward slash in front of the tag name inside of the normal angle brackets. It might be necessary to add additional content or structure with a tag. We do that using an attribute.
Here is our example tag we used previously. How ever, now we have added an attribute. I have high lighted the attribute.
<p align="center">This is text that will appear on a website</p>
As you can probably guess, the attribute, in this case, will center your text. An attribute is placed within the opening tag and an HTML tag can have one or many attributes. Attributes are always included in the opening tag. They are preceded by a space and they include the name of the attribute, an equal sign, and value in quotes.
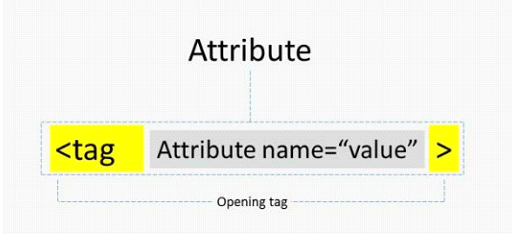
Figure: Placement of an attribute
With that as a base of understanding, I am confident you are ready to write your first lines of HTML5 code! There is only one additional tool that we need one of the most basic tools for building a web page is a text editor.
A text editor will not only house your code but it will also help you keep your web page project organized. A good text editor is your best friend when you build code for your sites.
There are many available options for very good text editors. For this project, we will use Brackets from Adobe. Brackets is a great editor, easy to install, and simple to use.
However, do not let its simplicity fool you. It also has very powerful capabilities and is used every day by many professionals building and maintaining the websites of tomorrow.
The first step is to download and install your text editor.
How to install and run Brackets:

1. In your browser, navigate to Brackets.io and click on the blue download button in the middle of the screen that says “Download Brackets”.
2. Click Open to open the Installer.
3. Follow the instructions on the installer and click finish or install.
4. When you are finished with the installation, open Brackets.
5. By default, Brackets opens a folder containing some simple “Getting Started” content. Read through this to get a feel for Brackets and some of the terminology used.
Don’t worry if you don’t understand some or all of what it covers.
Your First Program
Now that you have access to Brackets, it is time to build your first HTML5 script! Let me be the first to congratulate you. In the next few minutes, you will have your very first page up.
Your first step is to create a new folder where you would like to save your files and store your web page.
1. Right-click in the location you want to create your folders such as your desktop or normal folder directory
2. Click”New”
3. Click”Folder”
4. Name your folder My Page.
Now that you have a project folder created, it is time to start a file in your text editor.
In Brackets, click”file” and then “New”.
At this point, you have a blank text file in the text editor. This is exactly where every good web page starts.
Let’s type our first line of text into Brackets for our site. I’ll start with:
Thanks for visiting my page and learning more about me!
After typing this, follow this simple process to start saving your file.
1. Click “File”
2. Click “Save as”
3. Name your first page index.html
It is critical to use a .html extension so that your text editor and browsers know to read this file as an HTML file. The title index is a customary title for the primary or home page of a website. For the purpose of this exercise, I’ll save your first page as:
index.html
Now click “Save”. At this point, you should have your very first page to render to a browser. In Brackets, you will click on the small lightning bolt icon in the upper right of your screen to test your code in a browser. This is called the Live Preview feature.
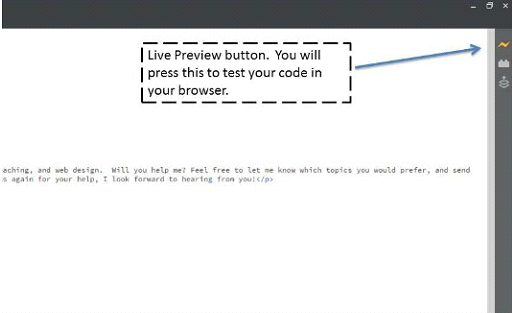
Figure: Live Preview feature in Brackets
If you do this now, you should see this
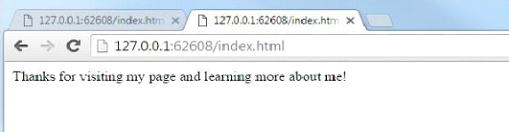
Figure: First rendering to the browser
Congratulations! This is small and humble the starting point of what will be a fantastic web page in the not so distant future. All web pages start as a blank canvas.
From this first step, we can see that we are able to render content to a browser with no additional HTML5. This will remain true throughout all of your scripts. Your text and other parts of your content will maintain their native structure.
The HTML tags and attributes that you place around your content will assist you in building a web page by structuring that content. Additionally, a great deal of styling, design and decorative elements will come from the CSS you add.
Let’s delete the first line we typed that we used as a test. We will now add some basic HTML tags and begin to build your actual site. We will add the tags below to your index.html file in Brackets. This is known as the HTML Boilerplate. It is the initial starting point for every page built-in HTML.
Code sample: Initial HTML Boilerplate
< DOCTYPE html>
<html>
<head>
<title></title> </head>
<body>
</body>
</html>
The !DOCTYPE declaration indicates to the browser the version of HTML that the document is written in.
Every HTML file you write will have the same starting point. It must be there and it must always be on top.
The first tag <html> simply tells the browser that an HTML file is being delivered and will need to be rendered.
The <head> tag acts as a container or place for content like titles and metadata that would normally go in the “head” or top of a document.
The <html> tags indicate the start and end of an HTML5 document. The text after the <title> tag will appear in the browser tab while the page is open. The title tag content is also used by search engines such as Google to index your site once it is launched on the web. The </title> closes that portion of the document and the </head> closes out the header section.
The <body> tag will act as a container for elements like paragraphs and images that typically appear in the body of a webpage. The </body> tag closes out that section, and the </html> signals the end of the document.
After typing in the boilerplate above, your code in your text editor should look like the image below:
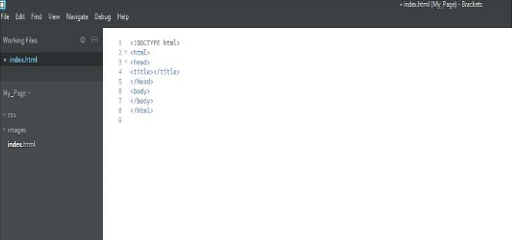
Figure: HTML boilerplate in Brackets editor
As a general rule, all tags which contain content will have both opening and closing tags. There are some tags that do not include or require closing tags, but they are beyond our current scope.
Now that we have our boilerplate, we need to determine the objective of our page, grab a few ideas, and then it is time to start building!
For our project, we will build a site to serve as a personal profile. It will provide a basic layout to a page that will contain personal details, images, links to favorite sites, information about work history, and a place for feedback from our visitors.
I will make up personal details about a fictional person and provide the basic structure for a personal profile type website. Feel free to add your details as we go in the text portions, but please ensure that you are following the code exactly.
The first step is to name our page. Between the <title> opening and closing tags, I will put “My page”, which will serve as our title. In the <body> section, I will put text welcoming our visitors.
Your code should now resemble what is shown below:
Code Sample: Adding initial content
<DOCTYPE html> <html>
<head>
<title>My Page</title>
</head>
<body
Thanks for visiting my page and learning more about me! </body>
</html>